Saturday, January 31, 2015

Unix - Find Command Argument List Too Long

When I was trying to use the following script to find all files under a directory and perform some task, I got arg list too long error.
for i in `find $WORKDIR/*Alarm* -mtime 1 -type f`
do
some task
done
After I changed to use below script, it worked as expected.
for i in `find $WORKDIR -name ‘*Alarm*’ -mtime 1 -type f`
do
some task
done


Create a Successful Online Store at Bigcommerce! Try it Free Now!

Friday, January 30, 2015

Oracle - Function Based Index

A function-based index computes the value of an expression that involves one or more columns and stores it in the index. The index expression can be an arithmetic expression or an expression that contains a SQL function, PL/SQL function, package function, or C callout.[1]
Oracle generates a column name of the format "SYS_NC?????$" in all_ind_columns table.

If you want to find the corresponding expression for the index, you can like this.

Execute:

SELECT a.index_name, a.column_name, b.column_expression FROM all_ind_columns a LEFT JOIN all_ind_expressions b ON A.index_name = b.index_name AND A.column_position = b.column_position WHERE a.index_name='table_name$unique_index_name';


Result:

table_name$unique_index_name  SYS_NC00031$   TRUNC("UPDATE_DATE")


References


  1. https://docs.oracle.com/cd/E11882_01/appdev.112/e41502/adfns_indexes.htm#ADFNS00505


Create a Successful Online Store at Bigcommerce! Try it Free Now!

Telerik Winforms 2010 SP1 - RadGridView - Populate ComboBoxColumn Data Source at Runtime

Assume you have a grid view radGridView1 and you have a combobox column in it. The column's header text is "Status".
You could use the following code to populate its data source at runtime.
void radGridView1_CellEditorInitialized(object sender, GridViewCellEventArgs e)
{
  if (e.Column.HeaderText == "Status")
  {
    RadComboBoxEditor editor = this.radGridView1.ActiveEditor as RadComboBoxEditor;
    RadComboBoxEditorElement element = editor.EditorElement as RadComboBoxEditorElement;

    element.DataSource = new string[] { "UP", "DOWN" };    

    element.SelectedValue = null;
    element.SelectedValue = this.radGridView1.CurrentCell.Value;
  }
}


Create a Successful Online Store at Bigcommerce! Try it Free Now!

Spark2.5.8 JID Nick Name | Spark 2.5.8 - Use JID Instead of Nick Name in Chat UI

Customize Spark: Use JID instead Nick Name

By default, Spark uses nick name (e.g. admin) in its private/group chat windows. If you want to use JID (e.g. admin@server/Spark) instead, consider the following two ways:
1.
private String getJidFromPresencePacket(Presence p)
{
  Collection<PacketExtension> extensions = p.getExtensions();      
  
  if (extensions instanceof List && !extensions.isEmpty())
  {
    Object obj = ((List<?>)extensions).get(0);
    
    if (obj instanceof MUCUser)
    {
      MUCUser.Item item = ((MUCUser)obj).getItem();
      
      if (item != null)
      {
        return item.getJid();
      }
    }
  }
  
  return p.getFrom();
}
2. a simpler way
private String getJidFromPresencePacket(Presence p)
{
  MUCUser mucUser = (MUCUser)p.getExtension("x", "http://jabber.org/protocol/muc#user");
  
  if (mucUser != null)
  {
    MUCUser.Item item = mucUser.getItem();
    
    if (item != null)
    {
      return item.getJid();
    }
  }      
  
  return p.getFrom();
}

XMPP JID

A JID consists of three main parts:
  1. The node identifier (optional)
  2. The domain identifier (required)
  3. The resource identifier (optional)

If you want to use only the node id and the domain id in your UI, you can use the method below to extract them from a JID:
StringUtils.parseBareAddress(JID)


Create a Successful Online Store at Bigcommerce! Try it Free Now!

Thursday, January 29, 2015

Revenue Hits Ad Preview 1 - Banners

Quickly find out all ads from RevenueHits.

Leader Board (728 * 90)


Full Banner (468 * 60)


Layer Ad (800 * 440)


Mid Layer Ad (600 * 330)


Medium Rectangle (300 * 250)


Wide Skyscraper (160 * 600)


Skyscraper (120 * 600)


Create a Successful Online Store at Bigcommerce! Try it Free Now!

JBoss7.1.1 Logging Runtime Change | JBoss AS 7.1.1 - Logging Configuration and Change at Runtime

Console Handler


Open standalone.xml and search for"<subsystem xmlns="urn:jboss:domain:logging:1.1".
For Console type handler, add the following:
<subsystem xmlns="urn:jboss:domain:logging:1.1">
  <console-handler name="CONSOLE">
    <level name="INFO"/>
    <formatter>
      <pattern-formatter pattern="%d{HH:mm:ss,SSS} %-5p [%c] (%t) %s%E%n"/>
    </formatter>
  </console-handler>
  <logger category="com.arjuna">
    <level name="WARN"/>
  </logger>
  <root-logger>
    <level name="WARN"/>
    <handlers>
      <handler name="CONSOLE"/>
    </handlers>
  </root-logger>
</subsystem>

Periodic Rotating File Handler


Configure periodic rotating file handler in this way:
<subsystem xmlns="urn:jboss:domain:logging:1.1">
  <periodic-rotating-file-handler name="FILE">
    <formatter>
      <pattern-formatter pattern="%d{HH:mm:ss,SSS} %-5p [%c] (%t) %s%E%n"/>
    </formatter>
    <file relative-to="jboss.server.log.dir" path="server.log"/>
    <suffix value=".yyyy-MM-dd"/>
    <append value="true"/>
  </periodic-rotating-file-handler>
  <logger category="com.arjuna">
    <level name="WARN"/>
  </logger>
  <root-logger>
    <level name="WARN"/>
    <handlers>
      <handler name="CONSOLE"/>
    </handlers>
  </root-logger>
</subsystem>

Size Rotating File Handler


Configure file rotating file handler in this way:
<subsystem xmlns="urn:jboss:domain:logging:1.1">
  <size-rotating-file-handler name="FILE">
    <formatter>
    <pattern-formatter pattern="%d{HH:mm:ss,SSS} %-5p [%c] (%t) %s%E%n"/>
    </formatter>
    <file relative-to="jboss.server.log.dir" path="server.log"/>
    <append value="true"/>
    <!-- size of a log file -->
    <rotate-size value="20M"/>
    <!-- no of log files to keep -->
    <max-backup-index value="50"/>
  </size-rotating-file-handl
  <logger category="com.arjuna">
    <level name="WARN"/>
  </logger>
  <root-logger>
    <level name="WARN"/>
    <handlers>
      <handler name="CONSOLE"/>
    </handlers>
  </root-logger>
</subsystem>

Change At Runtime


All these can be done at runtime without restarting JBoss. Check out the image below as a reference.


Create a Successful Online Store at Bigcommerce! Try it Free Now!

Apache Camel Exec - Run Executables

Assume you want to run an executable, you can utilize Camel's Exec component.
Such as:
exec://sh?args=-c+%22./someexec%22
It's pretty easy.

Sometimes you may get error message like "cannot execute binary file". Run the "file" command to check the executable's detail information.

If you get something like the following:
someexec: ELF 64-bit LSB executable, x86-64, version 1 (SYSV), dynamically linked (uses shared libs), for GNU/Linux 2.6.18, not stripped
It means that your executable is 64 bits but you're running it on a 32-bit OS.


Create a Successful Online Store at Bigcommerce! Try it Free Now!

Camel Exec IP Aliasing | Apache Camel Exec - Execute IP Aliasing Commands


IP Aliasing


IP aliasing is associating more than one IP address to a network interface. With this, one node on a network can have multiple connections to a network, each serving a different purpose. [1]

On Linux, if you want to enable IP aliasing for an interface, you can execute a command like:
ifconfig eth0:1.1.4.21 1.1.4.21 netmask 255.255.255.0
On the other hand, if you want to disable IP aliasing, you can execute a command like:
ifconfig eth0:1.1.4.21 down


Apache Exec


The Apache Exec component can be used to execute system commands. [2]

To enable IP aliasing, run exec with URL like:
exec://sh?args=-c+%22ifconfig+eth2%3A1.1.3.21+1.1.3.21+netmask+255.255.255.0%22&timeout=60000
And to disable it, use the following URL:
exec://sh?args=-c+%22ifconfig+eth2%3A1.1.4.21+down%22&timeout=60000
If alias was already set and you want to enable it again, or the alias is disabled and you want to disable it again, you'll get some error message, like
Cannot assign requested address

References


  1. Wikipedia, http://en.wikipedia.org/wiki/IP_aliasing
  2. Apache Camel, http://camel.apache.org/exec.html


Create a Successful Online Store at Bigcommerce! Try it Free Now!

Winforms - Update Control from Another Thread

Assume you're using a grid view to display status for some network devices, and you have a background thread which receives status update and then update the grid view.

You could do the update safely with the following:
public delegate void UpdateStatusDelegate(StatusData data);

public void UpdateStatus(StatusData data)
{
  if (!this.radGridView1.InvokeRequired)
  {
    UpdateStatus0(data);
  }
  else
  {
    UpdateStatusDelegate del = new UpdateStatusDelegate(UpdateStatusRowStatus);
    this.radGridView1.Invoke(del, new object[] { data });
  }
}

private void UpdateStatus0(StatusData data)
{//do actual update thing
} 

Here 'radGridView1' is the grid view control (which is a control in Telerik's Winform library).

You should NOT simply call UpdateStatus0(). Doing that will give you exception at runtime.


Create a Successful Online Store at Bigcommerce! Try it Free Now!

Wednesday, January 28, 2015

Oracle Tips

Alter date format

Oracle's default date format is YYYY-MM-DD, if you want to change it, you could use the following:


ALTER SESSION SET NLS_DATE_FORMAT='YYYY-MM-DD HH24:MI:SS'; 


Non-ASCII characters

Pay attention to non-ascii characters when you insert data. Because each of them ocuupies two bytes. Consider the following

Grandfathers Hut

The string needs 18 bytes instead of 17 (pay attention to ''), so you must ensure your columns size is enough.


Find RAC sessions

select * from v$session;

or

select * from gv$session;

You can find the users connecting to each node if you query the v$session. You must be aware of the node you are connecting when issuing this query because the information is exclusive from the node you are connected to.

If you query the gv$session the information gathered is the same, but as you can see it reports information from all RAC participant users.

If you take a look at the dynamic views, you will find a lot of gv$ views, those are global views that can be seen from whichever instance you are connected to and it will report information about all the instances in a single query. As you can see the gv$ views include an INST_ID (instance ID) column, which declares the number of instance the information comes from.

Find All Uniques Indexes

select * from all_indexes where index_name='table_name$unique_index_name';

select * from all_ind_columns where index_name='table_name$unique_index_name'; 

Unique indexes are stored in the table all_indexes instead of all_constraints since they are not only constraints but also indexes.


Create a Successful Online Store at Bigcommerce! Try it Free Now!

Oracle - Find Time Difference (in Seconds) of Two Timestamp Columns

Suppose you have two timestamp columns in an Oracle table, from_timestamp and to_timestamp, and you want to find the difference in seconds of the two columns. 

You can achieve it by using the following SQL statement:


SELECT FROM_TIMESTAMP, TO_TIMESTAMP, 

  (

  to_number(TO_CHAR(FROM_TIMESTAMP, 'J') * 86400 + TO_CHAR(FROM_TIMESTAMP, 'SSSSS')) - 

  to_number(TO_CHAR(TO_TIMESTAMP, 'J') * 86400 + TO_CHAR(TO_TIMESTAMP, 'SSSSS'))

  ) 

  TIME_DIFF

FROM SOME_TABLE; 


Create a Successful Online Store at Bigcommerce! Try it Free Now!

Tuesday, January 27, 2015

FileSystemXmlApplicationContext JBoss | Spring Context - FileSystemXmlApplicationContext Reads Wrong Resource Location from JBoss Standalone.xml

FileSystemXmlApplicationContext Reads Wrong Resource Location from JBoss

I have a legacy application which uses the following style to load Spring context:


String rootDir = System.getProperty("rootDir");

StringBuffer path = new StringBuffer();

path.append(rootDir);
path.append("/spring-context.xml");

ApplicationContext ctx = new FileSystemXmlApplicationContext(path.toString()); 

The 'rootDir' system property is defined in JBoss's standalone.xml as follow:


<system-properties>
  <property name="rootDir" value="/opt/jboss-as-7.1.1.Final/modules/someproject/main/conf"/>
</system-properties> 

The spring-context.xml file is put under "/opt/jboss-as-7.1.1.Final/modules/someproject/main/conf".
However, when I started JBoss and got this application running, it gave me this exception:

org.springframework.beans.factory.BeanDefinitionStoreException: IOException parsing XML document from file [/root/opt/jboss-as-7.1.1.Final/modules/com/someproject/main/conf/spring-context.xml]; nested exception is java.io.FileNotFoundException: opt/jboss-as-7.1.1.Final/modules/com/someproject/main/conf/spring-context.xml (The system cannot find the path specified)

It was weird because from the log it tried to load Spring context from "
opt/jboss-as-7.1.1.Final/modules/someproject/main/conf" (there is no "/" before "opt").

What happened?

Corel VideoStudio Pro X6 Pro

FileSystemXmlApplicationContext  Source Code

I tried to search on the Internet but got no answer. So I decided to read through source code based on the exception stack trace.

Finally I found the following code from FileSystemXmlApplicationContext.

protected Resource getResourceByPath(String path) {
  if (path != null && path.startsWith("/")) {
    path = path.substring(1);
  }
  return new FileSystemResource(path);
}

So it was Spring that removed the beginning slash!

Spring's Javadoc explains why:

<b>NOTE:</b> Plain paths will always be interpreted as relative
 * to the current VM working directory, even if they start with a slash.
 * (This is consistent with the semantics in a Servlet container.)
 * <b>Use an explicit "file:" prefix to enforce an absolute file path.</b>

OK. So the solution to this problem is:

AVG Family Safety 2015

JBoss System Properties Setting for FileSystemXmlApplicationContext to Work

1. Add an additional "/" to the beginning of the path, like this:

<system-properties>
  <property name="rootDir" value="//opt/jboss-as-7.1.1.Final/modules/someproject/main/conf"/>
</system-properties>

2. Prefix with "file:" to the path

<system-properties>
  <property name="rootDir" value="file:/opt/jboss-as-7.1.1.Final/modules/someproject/main/conf"/>
</system-properties>

I've tested solution 1 and it worked fine. I suppose solution 2 should also work.


Create a Successful Online Store at Bigcommerce! Try it Free Now!

JBoss AS 7.1.1 - HornetQ UnsatisfiedLinkError

You will see this exception when you are running HornetQ in JBoss 7 with debug level log enabled:

FINE [org.hornetq.core.asyncio.impl.AsynchronousFileImpl]  HornetQAIO -> error loading the native library

java.lang.UnsatisfiedLinkError: no HornetQAIO in java.library.path

          at java.lang.ClassLoader.loadLibrary(Unknown Source) 

This however is expected and the log level is trace. This message tries to inform you that the libAIO layer will look for either libHornetQAIO.so, libHornetQAIO32.so or libHornetQAIO64.so on your LD_LIBRARY_PATH. and if it can't use either of those it will fall back to NIO.


Create a Successful Online Store at Bigcommerce! Try it Free Now!

Monday, January 26, 2015

Maven - POM and Super POM

POM, or Project Object Model, is an XML file which stores necessary information, like version, dependent libraries and reports to be generated,  for Maven to build a project.

The XML primarily contains the following information:


<?xml version="1.0" encoding="UTF-8"?>
<project>
  <modelVersion>4.0.0</modelVersion> 
 
  <!-- The Basics -->
  <groupId>...</groupId>
  <artifactId>...</artifactId>
  <version>...</version>
  <packaging>...</packaging>
  <dependencies>...</dependencies>
  <parent>...</parent>
  <dependencyManagement>...</dependencyManagement>
  <modules>...</modules>
  <properties>...</properties> 
 
  <!-- Build Settings -->
  <build>...</build>
  <reporting>...</reporting>
  <!-- Project Meta Data -->
  <name>...</name>
  <description>...</description>
  <url>...</url>
  <inceptionYear>...</inceptionYear>
  <licenses>...</licenses>
  <organization>...</organization>
  <developers>...</developers>
  <contributors>...</contributors> 
 
  <!-- Environment -->
  <issueManagement>...</issueManagement>
  <ciManagement>...</ciManagement>
  <mailingLists>...</mailingLists>
  <scm>...</scm>
  <prerequisites>...</prerequisites>
  <repositories>...</repositories>
  <pluginRepositories>...</pluginRepositories>
  <distributionManagement>...</distributionManagement>
  <profiles>...</profiles>
</project>

The three fields - groupId, artifactId, and version, are the minimal basic fields that a POM definition must contain.

The Super POM is Maven's default POM. All POMs extend the Super POM unless explicitly set, meaning the configuration specified in the Super POM is inherited by the POMs you created for your projects.


Create a Successful Online Store at Bigcommerce! Try it Free Now!

Blogger SEO CSS | BlogSpot - Blogger Tips

SEO - Analysis Tool


Using SEO analysis tools is crucial, check out the following tools:


http://www.metachecker.net
http://seositecheckup.com
http://www.seoworkers.com

Since different tools use different algorithms to analyze your web pages, you may need to use more than one tool for a single page.


SEO - Use Headings


Try to use proper headings (h1, h2, etc. tags) for important content on your blog.


SEO - Page Title


By default, the blog name is put before the post title in the title tag; however search engines put more weight on the early words, so there is a need to change the pattern.


First, go to your template and edit the HTML; try to find the following snippet:

<title><data:blog.pageTitle/></title>

Then replace it with:
<b:if cond='data:blog.pageType == "item"'>
<title><data:blog.pageName/> - <data:blog.title/></title>
<b:else/>
<title><data:blog.pageTitle/></title>
</b:if>
 

SEO - Change Permalink


Permalink change is done at individual post level.

For new post, go to the edit post page and click on the 'Permalink' on the right of the page and choose 'Custom Permalink'.

For published post, at the same page, click 'revert to draft', then click on the 'Permalink' to show the 'Custom Permalink' option. 

SEO - Add Meta Author


Go to your blogger template and edit it by adding the following:
<meta name="author" content="Zhang Hao"/> 

SEO - Add Meta Description


Go to the edit post page, click on the 'Search Description' on the right of the page, then key in your description and click 'Done' button.

Wrapper Text in 'PRE' tag


By default, the text in 'PRE' tag is not wrapped, which causes part of long text will exceed the border of its container.


To address this, edit the template and find the location of stylesheet (by searching '/* Content' in the template), and add the following:


pre {
white-space:pre-wrap;
}

Cannot find 'Search Description' Option


Go to your blog's 'Setting -> Search Preference' page and enable 'Description' option, then the 'Search Description' option on each blog will appear.


Create a Successful Online Store at Bigcommerce! Try it Free Now!

Hibernate Mapping File PostgreSQL Uppercase letters | Hibernate Tool - Generate Mapping Files for PostgreSQL Tables with Uppercase Letters

Upper Case Letters Issue for Hibernate Mapping File Generation

I have problems using Hibernate tools when using uppercase letters in a PostgreSQL database (either in table name or column name).

Hibernate Configuration shows the tables, but it doesn't show columns. Reverse engineering also doesn't work.

The solution to this is to implement your own MetaDataDialect and put it into hibernate.cfg.xml.

Steps:

  1. Create a subclass of JDBCMetaDataDialect.
  2. Configure Hibernate to use the PostgreSQLMetaDialect by updating hibernate.cfg.xml.
  3. Add the class to the classpath.


Create Subclass of JDBCMetaDataDialect

The subclass of JDBCMetaDataDialect:

import org.hibernate.cfg.reveng.dialet.JDBCMetaDataDialect ;

public class PostgreSQLMetaDialect extends JDBCMetaDataDialect
{
    public boolean needQuote(String name)
    {        
        if(null != name && 0 != name.compareTo(name.toLowerCase()))
        {
            return true;
        } 
        else 
        {
            return super.needQuote(name);
        }
    }
}

Change hibernate.cfg.xml

hibernate.cfg.xml:

hibernatetool.metadatadialect=somepackage.PostgreSQLMetaDialect 


Create a Successful Online Store at Bigcommerce! Try it Free Now!

JBoss AS 7.1.1 - Crypto Libreary Not Found Issue When Migration from JBoss 4.2.3

JBoss 7.1.1 Crypto Library Not Found Issue

When I was migrating an application from JBoss 4 (4.2.3) to JBoss 7 (7.1.1), I encountered an issue:

java.lang.ClassNotFoundException: com.sun.crypto.provider.SunJCE

JBoss 7.1.1 Crypto Library Not Found Solution

After some search on the Internet, I managed to find a solution. Steps:
  1. Create a directory modules/sun/jdk/main;
  2. Under 'main', create a file module.xml;
  3. Add the following content to the file.
<module xmlns="urn:jboss:module:1.1" name="sun.jdk">
<resources>
    <resource-root path="service-loader-resources"/>
</resources>
<dependencies>
    <system export="true">
        <paths>
            <path name="com/sun/crypto/provider"/>
            <path name="com/sun/script/javascript"/>
            <path name="com/sun/jndi/dns"/>
            <path name="com/sun/jndi/ldap"/>
            <path name="com/sun/jndi/url"/>
            <path name="com/sun/jndi/url/dns"/>
            <path name="com/sun/security/auth"/>
            <path name="com/sun/security/auth/login"/>
            <path name="com/sun/security/auth/module"/>
            <path name="sun/misc"/>
            <path name="sun/io"/>
            <path name="sun/nio"/>
            <path name="sun/nio/ch"/>
            <path name="sun/security"/>
            <path name="sun/security/krb5"/>
            <path name="sun/util"/>
            <path name="sun/util/calendar"/>
            <path name="sun/util/locale"/>
            <path name="sun/security/provider"/>
            <path name="META-INF/services"/>
        </paths>
        <exports>
            <include-set>
                <path name="META-INF/services"/>
            </include-set>
        </exports>
    </system>
</dependencies>

The tricky part is path name="com/sun/crypto/provider"/>, which instructs JBoss to load necessary crypto lib for you.


Create a Successful Online Store at Bigcommerce! Try it Free Now!

Saturday, January 24, 2015

Graphviz Cannot Load Font Issue


Problem: 
couldn't load font: (dot.exe:XXX): Pango-WARNING **: couldn't load font "XX Not-Rotated YY", falling back to "Sans Not-Rotated YY", expect ugly output.

Solution:


Create a Successful Online Store at Bigcommerce! Try it Free Now!

Borland Together License Issue

Problem:

After Windows login ID changed, the license does not work.

Solution:

Run Together.exe as Administrator (local machine) first, then rerun it as domain user (new account).


Create a Successful Online Store at Bigcommerce! Try it Free Now!

Borland Together Database Reverse Engineering

You can perform a database reverse engineering to import schema from an existing database. Then Borland Together will generate an ER diagram for you.


You must use an account with administrative privilege.

Foreign keys can be added by using the Foreign Key link button from the diagram Palette and "Propagate Attributes" context menu command.


Create a Successful Online Store at Bigcommerce! Try it Free Now!

Borland Together Image Export - Modify File History

It is pretty easy, just Modify [workspace]\.metadata\.plugins\com.borland.tg.gde.imageexport\dialog_settings.xml.


Create a Successful Online Store at Bigcommerce! Try it Free Now!

Borland Together Report Generation (PDF) - Out of Memory Issue

In case out of memory issue occurred, you may try to allocate larger JVM size by updating Together.ini and eclipse.ini with appropriate -Xmx value.

If this does not work, you could try to use command line to generate report. Steps:

  1. go to the installation directory of Borland Together, eg C:\Borland\Together 
  2. run the command from the command prompt: gendoc "[project name]" "[package name]" -recursive -d "[output folder]" -format PDF -data "[workspace location]" 


eg. gendoc "project1" "com.project1.package1" -recursive -d "c:/temp/" -format PDF -data "c:\project".

Regarding the OutOfMemoryError, you may try to update C:\Borland\Together\gendoc.cmd by replacing 

set TG_JAVA_OPTIONS=-XX:MaxPermSize=256m -Xms512m -Xmx1024m

with 
set TG_JAVA_OPTIONS=-XX:MaxPermSize=256m -Xms512m -Xmx1024m -XX:SurvivorRatio=2.

Usage of gendoc.cmd:
gendoc.cmd [project name [package name]] [options]

[project name]       name of the project.
[package name]       name of the package.

[options] are:
  -help                  Display command line options
  -d <directory>         Destination directory for output files
  -template              Name of default template or path to template file
  -format                Documentation format: HTML, TXT, RTF, PDF or XSL-FO
  -nodiagrams            Do not create diagrams' pictures
  -hyperlinks            Include hyperlinked files' contents into documentation
  -audits                Include audits results into documentation
  -browser               Open documentation in browser


Create a Successful Online Store at Bigcommerce! Try it Free Now!

RadGridView – Animate Backcolor Of Grouped Row

The version of Telerik Winforms is 2010 SP1.


RadControls support animating many properties.
To animate the backcolor of a grouped row, you need to implement the ViewCellFormatting event handler with the following logic.
void radGridView1_ViewCellFormatting(object sender, CellFormattingEventArgs e)
{
 AnimatedPropertySetting setting = new AnimatedPropertySetting();

 setting.Property = GridCellElement.BackColorProperty;
 setting.StartValue = oldColor;
 setting.EndValue = newColor;
 setting.Interval = 100;
 setting.NumFrames = 50;
 setting.AnimatorStyle = AnimatorStyles.AnimateAlways;
 setting.ApplyEasingType = RadEasingType.Default;
 setting.UnapplyEasingType = RadEasingType.OutCircular;
 setting.ApplyValue(e.CellElement.RowElement);
}


Create a Successful Online Store at Bigcommerce! Try it Free Now!

RadGridView - Chagne Forecolor and Backcolor Of Grouped Row

The version of Telerik Winforms is 2010 SP1.
It's simple to change the forecolor, you need to implement the ViewCellFormatting event handler.
void radGridView1_ViewCellFormatting(object sender, CellFormattingEventArgs e)
{
 e.cellElement.ForeColor = Color.Blue;
}
While it's a little bit tricky to change the backcolor. You should not directly manipulate the cell element, like the following:
void radGridView1_ViewCellFormatting(object sender, CellFormattingEventArgs e)
{
 e.CellElement.BackColor = Color.Yellow
}
Instead, you need to use the row element.
void radGridView1_ViewCellFormatting(object sender, CellFormattingEventArgs e)
{
 e.CellElement.RowElement.BackColor = Color.Yellow
}


Create a Successful Online Store at Bigcommerce! Try it Free Now!

Telerik Winforms 2010 SP1 - RadGridView - Expand/Collapse Grouped Row with Single Click

Row grouping is supported by RadGridView. To expand/collapse a grouped row, user can double click the grouped row or single click the chevron icon chevron.
Sometimes you may want to expand/collapse a grouped row with a single click (just like Windows XP collapsible panel). To achieve this, here is the solution.
void radGridView_CellClick(object sender, GridViewCellEventArgs e)
{
 if (sender is Telerik.WinControls.UI.GridGroupExpanderCellElement)
  return;

 GridViewGroupRowInfo rowInfo = e.Row as GridViewGroupRowInfo;
 if (rowInfo == null)
  return;

 rowInfo.IsExpanded = !rowInfo.IsExpanded;
}

Pay attention to code in line 3 and 4, since RadGridView already handled single click event, in this event handler, we need to exclude it.


Create a Successful Online Store at Bigcommerce! Try it Free Now!

RadGridView - Customize the Text of Grouped Row

Default Format for Grouped Row Text in RadGridView


By default, RadGridView appends a ";" to the text of a grouped row, looking like:
remove-semicolon-from-grouped-row
It's pretty ugly.

Customized Grouped Row Text

To remove it, you need to implement the GroupSumaryEvaluate event handler with a customized format.
void radGridView_GroupSumaryEvaluate(object sender, GroupSummaryEvaluationEventArgs e)
{
 if (e.SummaryItem.FieldName == "Name")
 {
  e.FormatString = String.Format("Name: {0}", e.Value);
 }
}
Here is the final view:
remove-semicolon-from-grouped-row2


Create a Successful Online Store at Bigcommerce! Try it Free Now!

RadGridView - Show/Hide Columns Using Context Menu

Default Way to Show/Hide Columns in RadGridView

By default, to hide a column, user needs to click "Hide Column" in the context menu; to show a column, user needs to drag the column from the column chooser to the grid.


It's not a user-friendly way.

Use Context Menu to  Show/Hide Columns in RadGridView

In this article, I'll show how to show/hide columns using the context menu.
First, you need to register the event handler.
radGridView.ContextMenuOpening += new ContextMenuOpeningEventHandler(radGridView_ContextMenuOpening);
Next, add the implementation.
void radGridView_ContextMenuOpening(object sender, ContextMenuOpeningEventArgs e)
{
 if (e.ContextMenu == null || e.ContextMenu.Items == null)
  return;

 RadGridView radGridView = sender as RadGridView;

 if (radGridView == null)
  return;

 for (int i = 0; i < e.ContextMenu.Items.Count; i++)
 {
  if (e.ContextMenu.Items[i].Text == "Column Chooser" || e.ContextMenu.Items[i].Text == "Hide Column")
  {
   e.ContextMenu.Items[i].Visibility = Telerik.WinControls.ElementVisibility.Collapsed;
  }
 }

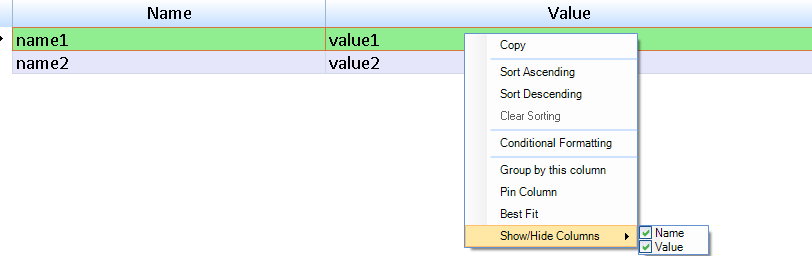
 RadMenuItem hideColumnsMenuItem = new RadMenuItem();
 hideColumnsMenuItem.Text = "Show/Hide Columns";

 int noOfColumnVisible = 0;

 foreach (GridViewColumn col in radGridView.Columns)
 {
  if (col.IsVisible)
  {
   noOfColumnVisible++;
  }
 }

 foreach (GridViewColumn column in radGridView.Columns)
 {
  GridViewDataColumn col = column as GridViewDataColumn;

  if (col == null || col.IsGrouped)
   continue;

  CheckBoxTag checkBoxTag = new CheckBoxTag();

  checkBoxTag.ColumnName = col.UniqueName;
  checkBoxTag.ColumnWidth = col.Width;
  checkBoxTag.RadGridView = radGridView;
  checkBoxTag.RadMenuItem = hideColumnsMenuItem;

  RadCheckBoxElement columnVisibilityCheckBox = new RadCheckBoxElement();
  columnVisibilityCheckBox.MouseDown += new MouseEventHandler(columnVisibilityCheckBox_MouseDown);
  columnVisibilityCheckBox.Text = col.HeaderText;
  columnVisibilityCheckBox.Tag = checkBoxTag;

  if (column.IsVisible)
  {
   columnVisibilityCheckBox.ToggleState = ToggleState.On;

   if (noOfColumnVisible <= 1)
   {
    columnVisibilityCheckBox.Enabled = false;
   }
  }
  else
  {
   columnVisibilityCheckBox.ToggleState = ToggleState.Off;
  }

  hideColumnsMenuItem.Items.Add(columnVisibilityCheckBox);
 }

 e.ContextMenu.Items.Add(hideColumnsMenuItem);
}

void columnVisibilityCheckBox_MouseDown(object sender, MouseEventArgs e)
{
 RadCheckBoxElement checkBox = sender as RadCheckBoxElement;

 CheckBoxTag checkBoxTag = checkBox.Tag as CheckBoxTag;

 string name = checkBoxTag.ColumnName;
 RadGridView radGridView = checkBoxTag.RadGridView;
 RadMenuItem radMenuItem = checkBoxTag.RadMenuItem;

 GridViewDataColumn column = radGridView.Columns[name] as GridViewDataColumn;

 if (column == null)
  return;

 int noOfColumnVisible = 0;

 foreach (GridViewColumn col in radGridView.Columns)
 {
  if (col.IsVisible)
  {
   noOfColumnVisible++;
  }
 }

 if (noOfColumnVisible <= 1)
 {
  if (checkBox.ToggleState != ToggleState.On)
  {
   column.IsVisible = true;

   foreach (Object obj in radMenuItem.Items)
   {
    RadCheckBoxElement checkBox2 = obj as RadCheckBoxElement;

    if (checkBox2 == null)
     continue;

    checkBox2.Enabled = true;
   }
  }
 }
 else
 {
  if (checkBox.ToggleState == ToggleState.On)
  {
   column.IsVisible = false;

   noOfColumnVisible--;
   if (noOfColumnVisible == 1)
   {
    foreach (Object obj in radMenuItem.Items)
    {
     RadCheckBoxElement checkBox2 = obj as RadCheckBoxElement;

     if (checkBox2 == null)
      continue;

     CheckBoxTag checkBoxTag2 = checkBox2.Tag as CheckBoxTag;

     if (checkBoxTag2 == null)
      continue;

     string name2 = checkBoxTag2.ColumnName;
     RadGridView radGridView2 = checkBoxTag2.RadGridView;

     GridViewColumn column2 = radGridView2.Columns[name2] as GridViewColumn;

     if (column2 == null)
      continue;

     if (column2.IsVisible)
     {
      checkBox2.Enabled = false;
      break;
     }
    }
   }
  }
  else
  {
   column.IsVisible = true;
  }
 }
}

Then, add the class CheckBoxTag.
class CheckBoxTag
{
 public int ColumnWidth
 {
  set;
  get;
 }

 public string ColumnName
 {
  set;
  get;
 }

 public RadGridView RadGridView
 {
  set;
  get;
 }

 public RadMenuItem RadMenuItem
 {
  set;
  get;
 }
}

Illustration for Show/Hide Columns Using Context Menu

Finally, you could see the new menu item is added to the context menu with all columns inside it.
show-hide-columns
Now, just click the checkboxes to show/hide columns.


Create a Successful Online Store at Bigcommerce! Try it Free Now!

Manually Create SNMP v3 Users without Net-SNMP

Create SNMP v3 users without Net-SNMP

Follow these steps to manually (not using net-snmp) create SNMP v3 users in Cent OS:
1. Stop snmp daemon by execute 'service snmpd stop'.
2. Add the following to /var/lib/net-snmp/snmpd.conf
createUser (username) MD5 (password) DES (encryption password)
3. Add the following to /etc/snmp/snmpd.conf
rouser (username) authpriv .1
4. Start the snmp daemon.
Bear in mind that you need to stop snmp before making configuration changes.


Create a Successful Online Store at Bigcommerce! Try it Free Now!

JBoss7.1.1 JMS | JBoss AS 7.1.1 - JMS Configuration

This article summarizes the issues I encountered during migration of a JMS application
from JBoss 4.2.3 to 7.1.1.

Configure Messaging and Remoting Modules

Refer to this article: http://blog.avisi.nl/2012/10/10/configuring-camel-to-use-hornetq-in-jboss-as-7.

RMI Port

if you previously used something like jnp://localhost:1099/, you need change it to remote://localhost:4447.

Handle Exception: javax.security.sasl.SaslException: 

Authentication failed: all available authentication mechanisms failed.
You need to add a user under Application Realm or remove the authentication by removing security-realm="ApplicationRealm" from
<subsystem xmlns="urn:jboss:domain:remoting:1.1">
           <connector name="remoting-connector" socket-binding="remoting" security-realm="ApplicationRealm"/>
</subsystem>
in your standalone.xml.

Handle Exception: javax.jms.JMSSecurityException

Unable to validate user: null
You need to set "security-enabled" to false in the standalone.xml.
<subsystem xmlns="urn:jboss:domain:messaging:1.1">
     <hornetq-server>
         <security-enabled>false</security-enabled>
         ......
     </hornetq-server>
</subsystem>

Add System Properties

System properties can be added into standalone.xml.
<server>
<extensions>
</extensions>
<system-properties>
     <property name="propertyName" value="property value"/>
</system-properties>
</server>

Then, in your program, you can retrieve them using System.getProperty("propertyName").

Create JmsTemplate for Topics

<bean id="jmsTopicTemplate" class="org.springframework.jms.core.JmsTemplate">
   <constructor-arg ref="connectionFactory" />
   <property name="pubSubDomain" value="true"/>
</bean>

Summary of Dependent Libs

hornetq-core-2.2.13.Final.jar
hornetq-jms-2.2.13.Final.jar
jboss-remote-naming-1.0.2.Final.jar
netty-3.2.6.Final.jar
spreing-jms-3.2.5.RELEASE.jar

Check more details here.


Create a Successful Online Store at Bigcommerce! Try it Free Now!

CSS3 Selector - nth-of-type

The :nth-of-type(n) selector matches every element that is the nth child, of a particular type, of its parent (from w3schools at http://www.w3schools.com/cssref/sel_nth-of-type.asp).
So assume you have the following HTML:
<ul class="clearfix">
  <li><a href="#bg1">content1</a></li>
  <li><a href="#bg2">content2</a></li>
  <li><a href="#bg3">content3</a></li>
</ul>
And you want to add something after each 'a', you should write style as follow:
li:nth-of-type(1) a::after{
  background: url(sbg1.jpg) no-repeat center;
}
li:nth-of-type(2) a::after{
  background: url(sbg2.jpg) no-repeat center;
}
li:nth-of-type(3) a::after{
  background: url(sbg3.jpg) no-repeat center;
}
The following will not work:
a:nth-of-type(1)::after{
  background: url(sbg1.jpg) no-repeat center;
}
a:nth-of-type(2)::after{
  background: url(sbg2.jpg) no-repeat center;
}
a:nth-of-type(3)::after{
  background: url(sbg3.jpg) no-repeat center;
}
This is because those 'a' elements have different parents.


Create a Successful Online Store at Bigcommerce! Try it Free Now!

PrimeFaces Google Map | Google Map (gmap) not Rendering in PrimeFaces

Google Map Properties

For google map to be rendered correctly, you need specify the following properties:
center, zoom, type and style, such as
<p:gmap center="41.381542, 2.122893" zoom="15" type="HYBRID" style="width:600px;height:400px" />
You can find details here:
http://stackoverflow.com/questions/4754708/primefaces-gmap-not-rendering

Longitude and Latitude Order

However, if you have done all these but the map is still not rendered, please check the 'center' property, for which you should put latitude before longitude. In the example above, 41.381542 is the latitude while 2.122893 is the longitude.


Create a Successful Online Store at Bigcommerce! Try it Free Now!

Camel Exec Command Script | Apache Camel Exec - Run Multiple Commands/Scripts at One Go

Camel Exec Windows Example

You could use the following settings to run multiple executables (including scripts) at one go using the Exec component.
On Windows:
<exec executable="cmd" argument="RAW(/c c:/batch1.bat;&amp;c:/batch2.bat)"/>

Camel Exec Linux Example

On Linux:
<exec executable="sh" argument="-c &quot;cd /product;./executable1;cd /customer;./executable2&quot;"/>
brookstone, free shipping

Camel Exec XML Example

If you use Java code instead of XML, you could simply replace '&' with '&' and '"' with '\"', and make them work.
Another thing I want to mention is that on Linux, it's better to run with './executable1' instead of 'executable1'.
Check more details here.


Create a Successful Online Store at Bigcommerce! Try it Free Now!

Apache Camel Ampersand URL | Apache Camel - Include an Ampersand in an URL

Camel URL Ampersand Issue

Recently I encountered a problem when I was using the Exec component to run multiple Windows batch files at one go.
All my parameters were put in an XML file, so I had something like:
<exec executable="cmd" argument="/c c:/batch1.bat;c:/batch2.bat"/>
However, with these settings, only the first batch file was executed.
After some search, I changed the configuration to
<exec executable="cmd" argument="/c c:/batch1.bat;&amp;c:/batch2.bat"/>
This time Camel complained it did not recognize some parameters (c:/batch2.bat). This was because Camel treats '&' as URL delimiter.

Use RAW  to Escape Ampersand

I managed to solve it by using the syntax RAW:
<exec executable="cmd" argument="RAW(/c c:/batch1.bat;&amp;c:/batch2.bat)"/>

What I want to mention is that RAW must be used to enclose the whole value of a parameter, not a part. So the following does not work:
<exec executable="cmd" argument="/c RAW(c:/batch1.bat;&amp;c:/batch2.bat)"/>

Check more details here.


Create a Successful Online Store at Bigcommerce! Try it Free Now!

JSF JSTL | Conditionally Display JSF Component: JSTL Tag vs. JSF Rendered Attribute

Initially I thought there were two approaches: using JSTL choose/when tags and using JSF rendered attribute.
However, I found that the first approach didn't work.
I wrote the following code and found that the 'otherwise' branch was always evaluated.
<c:choose>
    <c:when test="${status == 1}">
       <p:graphicImage value="green.png" />
    </c:when>
    <c:when test="${status == 2}">
       <p:graphicImage value="red.png" />
    </c:when>
    <c:otherwise>
       <p:graphicImage value="blue.png" />
    </c:otherwise>
</c:choose>
Buy Corel Painter 2015
Later I discovered explain to this issue at:
http://stackoverflow.com/questions/7437882/jstl-cchoose-cwhen-not-working-in-a-jsf-page, and
http://stackoverflow.com/questions/4870462/conditionally-displaying-jsf-components.
Simply speaking, JSTL tages are evaluated prior to JSF components processing.
So the second approach became the only choice.
<p:graphicImage value="green.png" rendered="#{status == 1}/>
<p:graphicImage value="red.png" rendered="#{status == 2}/>
<p:graphicImage value="blue.png" rendered="#{status != 1 and status != 2}/>
The above is the second approach.
However, this approach also has an issue.
I have a background appliation which sends status update at a certain interval. Upon receiving an update, the frontend application should update the web page.
So first I tried to add an ID to the graphicImage components in order to update one of them based on their id.
<p:graphicImage id="statusImage" value="green.png" rendered="#{status == 1}/>
<p:graphicImage id="statusImage" value="red.png" rendered="#{status == 2}/>
<p:graphicImage id="statusImage" value="blue.png" rendered="#{status != 1 and status != 2}/>
But JSF complained about duplicated IDs.

Finally I found a solution which was to use JQuery selector:
function updateStatusImage(status)
{
  var image;

  if (status == 1) image = 'green.png';
  else if (status == 2) image = 'red.png';
  else image = 'blue.png';

  $('#form img').attr('src', image);
}
Check more details here.


Create a Successful Online Store at Bigcommerce! Try it Free Now!